A new interest is stirring within me.
Woooooo.
"Hyperrealism is a genre of painting and sculpture resembling a high resolution photograph. Hyperrealism is a fully-fledged school of art and can be considered as an advancement of Photorealism by the methods used to create the resulting photorealistic paintings or sculptures. The term is primarily applied to an independent art movement and art style in the United States and Europe that has recently developed since the early 2000s. However, many Photorealists are also considered Hyperrealists."
Friday, October 30, 2009


Thursday, October 29, 2009
post 08: Julian Beever
Julian Beever is an artist who creates drawings with chalk on pavement. I guess he's not a 3-D artist. (Okay, he's definitely not a 3-D artist.) But he's AWESOME, none the less!
Though they're not 3-dimensional, they are supposed to portray 3 dimensions but only from one specific angle.

More to come.
Though they're not 3-dimensional, they are supposed to portray 3 dimensions but only from one specific angle.
More to come.
post 07, i guess...
Maybe I should just stop numbering my posts.
H'okay. Another photorealistic sculptor: Patricia Piccinini. She's not so much into making human forms-- she seems more into making weird creatures and automotive-objects (pretty gross). She is also Australian, and was born in 1965. She gained recognition in Australia in the 1990's, and in 2003, was selected as the artist to represent Australia at the Venice Biennale.
.jpg)


Ugh! I mean, wtf(reak) is that junk?!
H'okay. Another photorealistic sculptor: Patricia Piccinini. She's not so much into making human forms-- she seems more into making weird creatures and automotive-objects (pretty gross). She is also Australian, and was born in 1965. She gained recognition in Australia in the 1990's, and in 2003, was selected as the artist to represent Australia at the Venice Biennale.
Ugh! I mean, wtf(reak) is that junk?!
post06 (but not really)
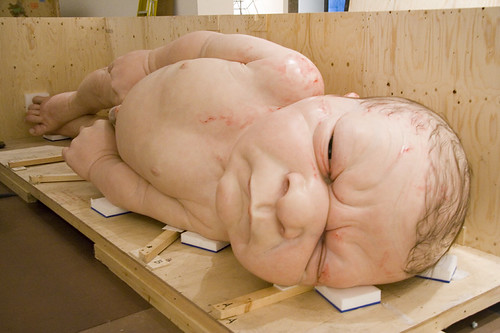
Artist Name: Ron Mueck.
He is an awe-inspiring, hyperrealist sculptor who began his career making props and models for movies. and stuff. Even cooler-- he's Austrailian! I wish I could find out exactly what he uses to make such realistic sculptures.. a few are made of silicone, and the rest are "mixed media". Maybe the mixed media means silicone and wax? Hmm.

He is an awe-inspiring, hyperrealist sculptor who began his career making props and models for movies. and stuff. Even cooler-- he's Austrailian! I wish I could find out exactly what he uses to make such realistic sculptures.. a few are made of silicone, and the rest are "mixed media". Maybe the mixed media means silicone and wax? Hmm.
Tuesday, October 27, 2009
post05 (I guess?)
Some cool stuff I found (:


I know this blog is supposed to mainly focus on 3-D artworks, but... I have to...
can't... resist...

Pretty cool, I think. Haha.
I know this blog is supposed to mainly focus on 3-D artworks, but... I have to...
can't... resist...
Pretty cool, I think. Haha.
Wednesday, October 21, 2009
post04
Last year, in the Scholastic National Art & Writing Awards, some teenager named "Joshua Tripoli" (I got the image below from searching his name on google images) made this painting. It is titled "Monument to Poverty", and it really stuck out to me. Maybe because it is creepy as ___ (scary noun), and it will haunt you in your dreams tonight.

Also, here is a GOOD example of an assemblage piece which I should have looked to for reference back when we were working on assemblage-artworks in AP-3D. It was also in the 2008 Scholastic National Art & Writing Awards, titled "Geared Up". It was made by Eric Griffin.

Also, here is a GOOD example of an assemblage piece which I should have looked to for reference back when we were working on assemblage-artworks in AP-3D. It was also in the 2008 Scholastic National Art & Writing Awards, titled "Geared Up". It was made by Eric Griffin.
post03 part 2
Here's the process of making part 2 of plaster mold-- it's REALLY simple:
(You'll only need the same materials from plastermold-part1)
First, Get your completed plastermold-part1. You should easily be able to take the object out of the mold, but in order to make part 2, you have to stick it back into the mold.
Using clay, build walls around the mold, the same way you built walls around the cube/rectangular-prism in plastermold-part1. There should be no cracks, weak spots, crevaces, or any areas through which the plaster can escape.
Using the brush, apply Murphy's Oil-Soap onto the object and the inner walls of plastermold-part2. This is, again, your release agent.
Carefully pour the plaster into your box-thing. This plaster will become part 2 of your plaster mold.
Wait overnight... again.
The next day, remove the clay above a trashcan, again, and take your object out of the plaster molds.
VOILA! Enjoy.
post: inspirations
These are some recent inspirations that have hit me pretty hard. Bam, dude.


UGHHH!! I am seriously creeped and heebie-jeebed up right now.
UGHHH!! I am seriously creeped and heebie-jeebed up right now.
Friday, October 16, 2009
post03 part 1
So here's the process I said I'd describe for making plaster molds.
First you gather all the materials: the object of your choice (preferrably small, smooth, hard, and compact-- no fibers or hairs), clay (does not have to be absolutely plastic), plaster mix (that's a whole different story. you just take the plaster and mix it into water in the right proportions), Murphy's Oil-Soap (it's a wood-floor cleaner, and our release agent), a brush (not too small), and a lot of luck, because it's likely you'll mess up the first (or second or third) time(s).
Take the clay and beat it into a cube/rectangular-prism. The clay does have to have enough plasticity so that you can push your object into the clay. The cube/rectangular-prism should be tall enough to where you can push your object halfway into the clay, and there will still be an inch of clay around and below the object.
Now you push your object halfway into the clay.
Build up walls (at least half an inch thick) around the cube/rectangular-prism. The wall should be a decent height, taller than the top of the object. Just keep in mind you will be pouring the plaster into the grave-thing you've just constructed.
Brush the Murphy's Oil-Soap directly onto the object and the inside walls of the clay-grave-thing.
Pour the plaster into the grave-thing. (Lightly!) tap it with your brush to make any bubbles below the surface rise. Not too hard, though.
Wait for about a day for the plaster to dry. Take off the clay, and stick that junk in a trash can. Just keep your object and the plaster mold.
This concludes the making of plaster mold part 1. I'll update later with part 2.
Tuesday, October 13, 2009
post02
Current Project: plaster mold
I am currently making a mold of a little ducky in my AP 3-D art class. The process is very complicated and I will explain it later. I can't wait till this project is OVER!
I am currently making a mold of a little ducky in my AP 3-D art class. The process is very complicated and I will explain it later. I can't wait till this project is OVER!
Monday, October 12, 2009
post01.
What does she mean by my "background"? Why did she put "background" in quotations?
Um, okay. Hi, I'm Grace. I'm 16. I'm Korean-American. I'm actually not sure how I feel about my art, ):
I started out taking an Intro to Art class in my freshman year. I put off Political Science for that Intro class... and I'm paying for it now. In sophomore year, I took Ceramics 1&2 in place of a science course... which I'm also paying for now. Currently in my junior year, I am taking an AP-3D course. My preferred medium of choice is, of course, clay-- I've never even taken a Sculpture class, to be honest.
I'm actually more comfortable with 2-D art than 3-D. I think I first started drawing when I was 6 years old because of my interest in Sailor Moon (no kidding). I guess I just... continued to evolve from there.
This blog is intentially going to be devoted to mainly 3-D artworks, but I have to admit-- my favorite artist is Salvador Dali. I'm pretty sure he's the artist who stimulated my interest in taking art classes in the first place.
Here are some of his works:


and my favorite:

Um, okay. Hi, I'm Grace. I'm 16. I'm Korean-American. I'm actually not sure how I feel about my art, ):
I started out taking an Intro to Art class in my freshman year. I put off Political Science for that Intro class... and I'm paying for it now. In sophomore year, I took Ceramics 1&2 in place of a science course... which I'm also paying for now. Currently in my junior year, I am taking an AP-3D course. My preferred medium of choice is, of course, clay-- I've never even taken a Sculpture class, to be honest.
I'm actually more comfortable with 2-D art than 3-D. I think I first started drawing when I was 6 years old because of my interest in Sailor Moon (no kidding). I guess I just... continued to evolve from there.
This blog is intentially going to be devoted to mainly 3-D artworks, but I have to admit-- my favorite artist is Salvador Dali. I'm pretty sure he's the artist who stimulated my interest in taking art classes in the first place.
Here are some of his works:
and my favorite:
Wednesday, October 7, 2009
Mother & Child
Concentration Ideas:
1. Mother forming the baby from a material-- it is the same material she is made of, and it is connected to her-- a part of herself.
2. A baby inside a blanket held by a stork's beak.
3. Woman's torso with inflamed belly.
4. Hand cradling egg.
5. two sleeping forms underneath a blanket-- one much smaller in size.
6. Child crying over limp form.
7. Russian dolls-- only 2, the mom and the baby.
8. Egg with many cracks, obviously ready to hatch.
9. Crying baby wrapped in blanket, alone.
10. Arms throwing baby into air.
Subscribe to:
Posts (Atom)
